What’s New with the RISA-Revit Link v24.0.2?
We're thrilled to announce the release of the RISA-Revit Link v24.0.2, a game-changing update designed to streamline your engineering workflows...

Try the Complete RISA Suite for
10 Days FREE

RISA Education

Video Library

Online Help

Get Support

About Us
Integrating structural models from RISA to Revit seamlessly can sometimes present challenges, especially when it comes to importing shapes accurately. Unlike RISA, Revit operates on a different system, requiring users to preload family shapes for drawing or importing purposes. In this support article, we'll delve into the process of adding shapes to Revit from RISA, ensuring a smooth transition between the two platforms. Let's navigate through the steps together to optimize your workflow and enhance your structural modeling experience.
REVIT does not automatically bring your RISA model's section shapes in. Revit requires the user to select individual shape families to be brought into the model file. Once you've gone through the list and added the shapes that you will be bringing over from RISA, you can then perform the import from RISA which will eliminate warning messages and will bring over the shapes as modeled in RISA.
In the following import example, we will show step-by-step how to add Revit family shapes. In this case, to bring in a W shape member. So we'll need to load the steel W Shape Family. But you will follow the same steps for all the other Revit material families, not just steel members. For example, if you want to load a CFS shape, you will navigate to the folder Structural Framing --> Light Gauge Steel instead.
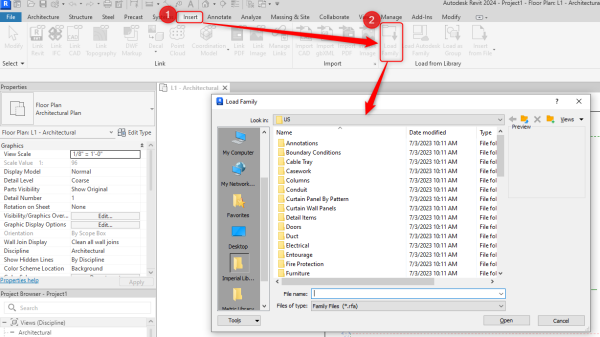
In your Revit Template, go to Insert --> Load Family as shown below:

You can then navigate to the "Structural Framing" directory and then to "Steel" as shown below:
-1.png?width=600&height=377&name=image%20(43)-1.png)
From there you can choose the shape type and select Open.
Once you select the shape type, you are prompted to select each shape within the shape type that you want to bring in as shown below:

**Tip: Don't have the Revit shape library downloaded to your desktop? See the clip below to download shapes directly from the Autodesk cloud.
For more information on the RISA-Revit Link, search our other support articles, videos, and content on risa.com. We also have a great handout for Tips & Tricks for the RISA-Revit link. Click the button below.

We're thrilled to announce the release of the RISA-Revit Link v24.0.2, a game-changing update designed to streamline your engineering workflows...

RISA is pleased to announce the release of the latest RISA-Revit Link which is compatible with Revit 2020. The RISA-Revit Link v19.0 allows...

RISA is pleased to announce the release of the latest RISA-Revit Link which includes compatibility with Revit 2023. The RISA-Revit Link v23.0...